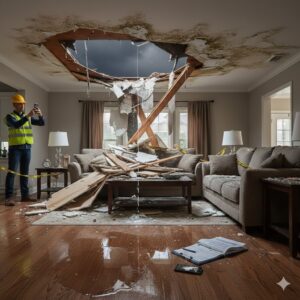
The sound is unmistakable and terrifying: a deep, menacing crack, followed by the roar of debris and a sudden cloud of dust. A ceiling collapse is one of the most shocking and destructive events a homeowner can face. In a matter of seconds, your living room, bedroom, or kitchen is transformed into a disaster zone, littered with drywall, insulation, and timber.
In the immediate aftermath, your mind races. Is everyone safe? What do I do now? Who is going to pay for this?
This guide is designed to answer that last question. Navigating a ceiling collapse insurance claim can be complex, but with the right knowledge, you can manage the process effectively. We will walk you through every stage, from the initial emergency response to receiving your final settlement check, ensuring you are prepared, informed, and equipped to get the recovery you deserve.
Ceiling Collapse Insurance Claim
Part 1: Understanding Why Ceilings Collapse (And What Your Policy Covers)
Before you pick up the phone to call your insurance company, it’s crucial to understand why your ceiling collapsed. The cause is the single most important factor in determining whether your claim will be covered. Insurance policies are designed to cover “sudden and accidental” events, not issues caused by long-term neglect.
The “Peril” vs. “Maintenance” Distinction
In the insurance world, a “peril” is an event that causes damage. Your homeowner’s insurance policy covers specific perils. However, it explicitly excludes damage resulting from a lack of maintenance, also known as “wear and tear.”
Let’s look at the most common causes of ceiling collapses and how they are typically classified.
Common Covered Perils (The “Good” News)
If your collapse was caused by one of the following, your claim has a strong chance of being covered:
-
Plumbing Leaks (Sudden & Accidental): This is the number one cause of ceiling collapses. A pipe inside a wall or ceiling can burst or develop a sudden leak. Water saturates the drywall until it can no longer hold the weight, leading to a collapse. Because this is accidental, it is typically covered.
-
Important Note: If the leak was long-term and you ignored the signs (like a small stain you painted over for years), the insurer may argue it was preventable, which complicates things.
-
-
Weather-Related Events: A severe storm tears a hole in your roof, allowing rain to pour in and saturate the ceiling. Similarly, ice dams can form on gutters, forcing water back under the shingles and into the house. These “acts of God” are standard covered perils.
-
Impact Damage: If a large tree limb falls on your roof during a storm, or if a vehicle accidentally hits your house, the structural damage and subsequent interior collapse are covered.
-
Vermin or Pest Infestation: This is a trickier one. If a sudden, active infestation of rodents or termites gnaws through structural supports and causes a collapse, it may be covered. However, if the damage occurred over many years due to an untreated infestation, it will likely be considered a maintenance issue.
Common Causes of Denial (The “Bad” News)
These scenarios are frequently denied because they represent a failure to maintain the property.
-
Long-Term Water Leaks (Seepage): A slow, continuous leak from a failing roof or a cracked pipe that has been leaking for months is considered “seepage” or “continuous or repeated seepage or leakage.” This is explicitly excluded from almost all standard policies.
-
Poor Workmanship or Defective Materials: If a ceiling collapses because a contractor did a shoddy job installing it 10 years ago, or because the materials were faulty, your homeowner’s insurance likely won’t cover it. This falls under the category of faulty construction.
-
Attic Storage Overload: It might seem harmless, but storing heavy boxes, old furniture, or even heavy books in an unconditioned attic can cause the ceiling drywall below to sag and eventually collapse. This is considered a foreseeable result of your actions, not a covered peril.
-
Normal Wear and Tear: As a house ages, materials degrade. Lath and plaster in old homes can simply lose their key (the bond) over a century and give way. This natural aging process is not insurable.
Important Note for Readers: Take a moment right now to find your insurance policy declaration page. It lists your coverage limits and deductibles. Knowing these numbers before a disaster happens is invaluable. It sets a realistic expectation for what your insurer will pay.
Decoding Your Insurance Policy: Key Terms to Know
To navigate your claim, you need to understand the language of your policy. Here is a quick glossary:
-
Dwelling Coverage (Coverage A): This pays to repair the structure of your home, including the ceiling, walls, roof, and floors. This is where the bulk of your repair funds will come from.
-
Personal Property Coverage (Coverage C): This covers your belongings. If your couch, TV, or heirlooms were crushed or water-damaged by the collapse, this part of your policy kicks in.
-
Loss of Use (Coverage D): If your home is uninhabitable due to the collapse, this covers your additional living expenses (ALE), such as hotel bills, restaurant meals, and laundry services, while your home is being repaired.
-
Actual Cash Value (ACV): This is the depreciated value of your property. For example, if your 10-year-old roof collapses, the insurer will pay for a 10-year-old roof’s worth of materials, minus your deductible. This is the standard for many policies.
-
Replacement Cost Value (RCV): This is a much better, but often more expensive, type of coverage. The insurer pays to replace your damaged property with new materials of similar kind and quality, without deducting for depreciation. They often pay the ACV first, and then release the “recoverable depreciation” after you complete the repairs and submit the receipts.
-
Deductible: This is the amount you are responsible for paying out of pocket before your insurance coverage begins. For a claim this size, it is typically a flat dollar amount (e.g., $1,000, $2,500).
Part 2: The First 24 Hours – Your Emergency Action Plan
The moments and hours immediately following a collapse are critical. Your actions can protect your family, prevent further damage, and significantly strengthen your insurance claim.
Step 1: Ensure Safety First
-
Evacuate the Area: Do not go back into the room. There is a high risk of further collapse. Keep children and pets far away.
-
Watch for Hazards: A ceiling collapse often brings down live electrical wires, light fixtures, and insulation. Assume everything is dangerous.
-
Turn Off Utilities (If Safe): If you suspect water damage or see sparks, and you can do so without stepping into the hazardous area, turn off the water and electricity at the main shutoffs. If you can’t reach them safely, call the fire department or a utility company.
Step 2: Stabilize and Prevent Further Damage
Once everyone is safe, your next job is to “mitigate your damages.” Insurance policies require you to take reasonable steps to protect your property from further harm.
-
Tarp the Roof (If Necessary): If the collapse is due to a roof leak and the weather is still bad, you need to stop more water from coming in. This is not a DIY job in the rain. Call a roofing or emergency restoration company. Keep the receipt for the tarp and any emergency service.
-
Set Up Buckets: If water is still dripping, place buckets to catch it.
-
Remove Undamaged Belongings: Carefully move furniture and personal items from the affected area to a safe, dry place to prevent secondary water damage.
Step 3: Document Everything
Before you touch anything, before the restoration crew arrives, and before the insurance adjuster comes, you must become a documentarian. This evidence is the backbone of your claim.
-
Take Photos and Videos: Do a thorough walkthrough.
-
Wide shots: Show the entire room and the extent of the debris.
-
Close-ups: Capture the collapsed materials, any visible water damage, the condition of the roof if accessible, and any broken pipes.
-
Belongings: If personal property was damaged, take photos of the items in the debris.
-
The Cause: If you can safely see the source (like a burst pipe), photograph it.
-
-
Preserve Evidence: If possible, keep a sample of the collapsed ceiling material. Don’t throw anything away until the adjuster has seen it.
Step 4: Contact Your Insurance Company
You should file your claim as soon as possible. Have your policy number ready and be prepared to answer basic questions.
-
What to say: Be factual and concise. “Our ceiling collapsed due to what we believe is a burst pipe. Here is our address. The damage is extensive, and we have taken steps to mitigate further damage.”
-
What to ask:
-
“What is my deductible and coverage limit?”
-
“Will an adjuster be sent to my home, and when?”
-
“Does my policy cover Additional Living Expenses (ALE)?”
-
“Do you have a list of preferred vendors for emergency restoration?”
-
A Friendly Reminder: The person on the phone is a claims agent, not your advocate. They are gathering information. Be cooperative, but you do not need to give a detailed, recorded statement about the cause of the collapse at this moment. Stick to the facts of what happened.
Part 3: The Claims Process – What to Expect
Once the dust settles (literally) and the emergency is under control, the formal claims process begins. This can take weeks or even months, depending on the complexity and the extent of the damage.
The Insurance Adjuster’s Visit
The insurance company will send an adjuster to inspect the damage. This person’s job is to assess the loss and determine how much the insurance company will pay.
-
Be Present: You have the right to be home during the inspection. This is your opportunity to walk the adjuster through the damage and point out everything you’ve documented.
-
Show, Don’t Just Tell: Walk them through your photo and video evidence. Show them where personal belongings were damaged. Point out the source of the problem (the burst pipe, the roof hole, etc.).
-
The “Scope of Work”: The adjuster will create a “scope,” a detailed document listing everything that needs to be repaired or replaced. Ask for a copy of this scope before they leave.
-
Get Your Own Estimate: This is a critical step. While you wait for the adjuster’s report, hire a reputable, local general contractor to provide their own detailed repair estimate. Do not use an adjuster-recommended contractor if you want a second opinion, as their interests may be aligned. This gives you a benchmark to compare against the insurer’s estimate.
Understanding Your Settlement
After the adjuster’s visit, they will generate a report and an initial settlement offer. This can be confusing, so let’s break it down.
The Initial Payment (Often ACV)
You will likely receive a first check relatively quickly. This is usually the Actual Cash Value (ACV) of the loss, minus your deductible. It is intended to get you started, but it won’t be enough to complete the full, like-new repairs.
The Depreciation Holdback
This is the difference between the ACV and the Replacement Cost Value (RCV) . For example:
-
Your damaged ceiling (materials and labor) will cost $10,000 to replace.
-
The adjuster determines the old ceiling had a depreciated value of $7,000 (ACV).
-
They send you an initial check for $7,000 minus your $1,000 deductible = $6,000.
-
The remaining $3,000 is the “recoverable depreciation.” You will only get this money after you complete the repairs and submit the final invoices to your insurance company proving you spent the money.
The Final Payment (Recovering Depreciation)
Once the work is done, you submit the paid receipts and a final invoice to your insurer. They will then release the holdback, giving you the full RCV.
How to Calculate Your Potential Payout
Let’s visualize this with a simple table.
| Item | Description | Amount |
|---|---|---|
| Total Cost of Repairs | Contractor’s estimate to fix ceiling, paint, etc. | $15,000 |
| Depreciation | Value lost due to age/condition of old materials | – $3,000 |
| Actual Cash Value (ACV) | The value of what was lost at the time of loss | = $12,000 |
| Your Deductible | Your out-of-pocket cost | – $1,000 |
| Initial Payment Check | Money you get to start the work | = $11,000 |
| Recoverable Depreciation | Money held back until repairs are done | $3,000 |
| Total Potential Payout | (Initial Payment + Recovered Depreciation) | $14,000 |
Part 4: The Art of Negotiation – Getting What You’re Owed
It is a common misconception that the insurance adjuster’s first offer is final. It is often a starting point. Your goal is to get a settlement that fully covers the cost of repairing your home with quality materials and labor.
Why You Should Get Your Own Contractor’s Estimate
Your contractor is your greatest ally in this process. Their estimate is based on real-world, local prices. The adjuster’s estimate is often based on software that uses national averages, which can be lower.
-
Line-by-Line Comparison: When you get your contractor’s estimate, compare it line-by-line with the adjuster’s scope of work.
-
Look for Discrepancies:
-
Omitted Items: Did the adjuster forget to include the cost of repainting the entire room, not just the new ceiling? Did they account for matching the paint?
-
Underestimated Costs: Did they price standard drywall when your ceiling requires special fire-code materials? Did they miss the need for extra structural support?
-
Incorrect Quantities: Did they measure the room incorrectly?
-
-
The “Invisible” Damage: Water doesn’t just ruin drywall. It soaks into insulation, soaks wooden studs, and ruins the subfloor. An inexperienced adjuster might miss this. Your contractor, who will be doing the work, will not.
Presenting Your Case
If the offers don’t match, it’s time to negotiate.
-
Be Professional and Organized: Don’t get angry or emotional. Compile a “damage dossier” that includes your contractor’s estimate, your photos, and a clear, bulleted list of the discrepancies you’ve found.
-
Make the Call: Call your adjuster and calmly walk them through the differences. “I’ve reviewed the scope, and I’ve had a local contractor provide an estimate. There are a few areas where their pricing seems more accurate for our market, specifically regarding [mention a specific item, like debris removal or material costs].”
-
Request a Re-inspection: If the differences are major, you can request that the adjuster meet you and your contractor at the property to go over the scope together. This is often the most effective way to resolve disputes.
When to Call in Reinforcements
Sometimes, despite your best efforts, you hit a wall. If the insurance company is being unreasonable or is offering far less than what you believe is fair, you have options.
-
Public Adjuster: This is an independent adjuster you can hire to represent your interests. They will re-inspect the damage, prepare a full estimate, and handle all negotiations with the insurance company. They typically take a percentage (10-15%) of the final claim payout. This can be well worth it for large, complex claims.
-
Attorney: If your claim is denied in bad faith or the dispute is severe, you may need a lawyer who specializes in insurance claims. This is a more aggressive and expensive step, but sometimes necessary.
Important Note for Readers: Always keep a log of every single call you have with your insurance company. Write down the date, time, who you spoke with, and a summary of what was discussed. This paper trail is invaluable if disputes arise.
Part 5: Navigating Special Circumstances
Not every ceiling collapse claim is straightforward. Certain situations bring unique challenges.
Scenario A: The Vacant or Rental Property
Insurance policies for vacant homes or rental properties are different from standard homeowner’s policies.
-
Vacancy Clause: Many policies have a clause that voids coverage for certain perils (like vandalism or water damage) if the home has been vacant for more than 30 or 60 days.
-
Landlord Insurance: If you are a landlord, you should have a specific landlord/dwelling fire policy. It covers the structure but may not cover the tenant’s personal property. The tenant would need their own renter’s insurance for that.
-
Tenant’s Responsibility: If you are a renter and the ceiling collapses due to a maintenance issue the landlord ignored, the landlord’s insurance should cover the structure, but your renter’s insurance covers your destroyed laptop, furniture, and clothes.
Scenario B: Denied Claims
Receiving a denial letter is devastating, but it’s not always the end of the road.
-
Read the Denial Letter Carefully: It will state the exact reason for the denial based on your policy language. (e.g., “Loss caused by continuous seepage is excluded under Section I, Exclusion 2.c.”).
-
Review Your Policy: Look up the exact clause they cited. Do you agree with their interpretation?
-
The Appeal: You have the right to appeal the decision. Your denial letter will outline the process and timeline. Your appeal should be a formal letter, and you should include any evidence that contradicts their finding. For example, if they denied it as “seepage,” but you have photos of the burst pipe that caused a sudden leak, you have a strong case.
-
File a Complaint: If you believe the insurer is acting in bad faith, you can file a complaint with your state’s Department of Insurance. They will review the case to ensure the company is following state laws and policy terms.
Scenario C: Mold
Water and darkness are a recipe for mold. After a water-related collapse, mold can begin to grow within 24-48 hours.
-
Limited Coverage: Most standard policies have very limited coverage for mold remediation, often capping it at a few thousand dollars.
-
The “Result of a Peril” Argument: The key is to argue that the mold is a direct result of the covered water damage (the burst pipe), not a separate maintenance issue. Your claim is for the water damage; cleaning up the resulting mold is a necessary part of that repair.
-
Immediate Action: This is why your “duty to mitigate” is so crucial. By drying out the area immediately, you can often prevent mold from taking hold, avoiding this complication entirely.
Part 6: Your Rights and the Fine Print
As a policyholder, you have rights. Knowing them is your best defense against a lowball offer or an unfair denial.
The “Duty to Mitigate”
We’ve mentioned this before, but it bears repeating. You have a contractual obligation to protect your property from further damage. If you fail to tarp a hole in the roof and it rains for three days, causing even more damage, the insurance company can deny coverage for that additional damage.
The “Right to Repair”
You have the right to choose your own contractor. The insurance company cannot force you to use their preferred vendor. They may recommend someone, but the choice is always yours. Using your own trusted contractor often leads to a better, more transparent result.
The “Bad Faith” Clause
Insurance companies have a “duty of good faith and fair dealing” towards you. If they violate this, it’s called “bad faith.” Examples include:
-
Unreasonably delaying the investigation or payment of your claim.
-
Misrepresenting policy terms to you.
-
Failing to conduct a reasonable investigation.
-
Denying a claim without a valid basis.
If you suspect bad faith, consulting with a public adjuster or attorney is a good idea.
A Comparative Look at Claim Outcomes
To see how these factors play out, let’s look at two very different homeowners.
| Factor | Homeowner A: The Prepared One | Homeowner B: The Unprepared One |
|---|---|---|
| Immediate Response | Turned off water, tarped the roof, took 100 photos. | Panicked, left the room untouched, didn’t stop the leak. |
| Documentation | Had photos of the burst pipe, kept a sample of debris. | Took one blurry photo with their phone. Threw debris away. |
| Contractor | Hired their own trusted contractor for a detailed estimate. | Agreed to use the adjuster’s recommended contractor. |
| Negotiation | Compared estimates, found discrepancies, negotiated a higher payout. | Accepted the first check, which didn’t cover all repair costs. |
| Final Result | Received full RCV payout, home repaired to their satisfaction. | Ran out of money mid-project, had to settle for cheaper materials. |
Conclusion: Turning a Disaster into a Recovery
A ceiling collapse is a traumatic event, but it does not have to be a financial catastrophe. By understanding your policy, acting swiftly to secure your home, and meticulously documenting the damage, you take control of the situation. Remember that the initial insurance offer is just the beginning of a conversation. Arm yourself with your own expert contractor, compare estimates, and don’t be afraid to ask questions and negotiate. You are not just a claimant; you are a consumer who has paid for protection. This guide is your roadmap to ensuring that protection delivers when you need it most.
Frequently Asked Questions (FAQ)
1. How long do I have to file a ceiling collapse claim?
This depends on your policy and your state’s laws. Insurance policies often require you to give “prompt notice” of a loss. Additionally, your policy has a “suit against us” clause, typically giving you one year from the date of loss to file a lawsuit if your claim is denied. It is always best to file your claim immediately.
2. Will my insurance rates go up after filing a claim?
Possibly. Filing a claim can sometimes lead to a premium increase at renewal, especially if you have made other claims recently. However, for a major, unavoidable event like a ceiling collapse, many insurers understand it’s not indicative of your risk as a homeowner. It is still almost always financially worthwhile to file the claim rather than paying for the massive repairs yourself.
3. What if the damage is worse than the adjuster initially thought?
This is called a “supplemental claim.” Once your contractor starts the work (for example, they open up a wall and find the studs are rotted), they can submit a supplement to the insurance company with photos and a new estimate for the additional, hidden damage. The insurer should then pay for this additional, necessary work.
4. My claim was denied because of “wear and tear.” Can I do anything?
Yes. First, get a second opinion from an independent contractor or structural engineer. They can provide a report stating that the collapse was caused by a specific, sudden event (like a hidden pipe leak) and not simple aging. You can then submit this professional opinion as part of an appeal to challenge the denial.
5. Should I clean up the debris myself?
Only if it is safe to do so and you have already taken extensive photos and video. However, it is often best to leave this to the professionals. They know how to safely handle materials that may contain asbestos, lead paint, or simply be unstable. Your cleanup costs should be included in your claim.